Showing posts with label MUFE. Show all posts

Monday, November 14, 2011

IMATS 2011 Recap

So IMATS happened in Toronto this past weekend.  For those that don't know it's an International Makeup Trade Show that comes once a year.  For the past couple of years I've worked the Yaby booth w/ creator Liz Yu and fellow makeup/hair artist Ashley Readings.  This year I could only work the Sunday b/c I had a wedding on the Sat. but it was still a great time, I got to meet some great ppl (nice finally meeting you Delia, Roshar & Angie!) and of course do a little shopping!

I'll be honest I really didn't buy that many "exciting" things when it came to makeup this year.  Actually I  know this is sad but I don't buy too many "exciting" makeup products in general anymore :(  These days I find myself mostly just stocking up on supplies and replenishing my kit.

From Yaby I basically just stocked up on some of my fav/popular Powder Foundations, Liquid Foundations, Concealers and Highlighters...the only thing I did get that was "Fun" was some new lipsticks lol!

From Alcone I got my usual big bag of sponges that I try to make last for at least most of the year.  I use to use a lot of sponges while I worked...I'm trying to cut down on this now lol.  I use to always get all my disposables from the booths at IMATS too but now I just get things on ebay...God I LOVE ebay lol!

I of course stocked up on my fav. go to moisturizer - Embryolisse .  It's a makeup artist staple and I've been using it for the past couple of years now.  I also picked up a new moisturizer they have designed specifically for Oily skin (key ingredient being cornstarch) - Emulsion Hydra Matt.  I couldn't resist after Vicki Millar stopped by the booth to tell me about it!

I was also lucky enough to get the LAST newly designed brush cup from MUFE!  My old one has def. seen better days and when I saw Roshar w/ the  new one I knew I had to get it!  At first they thought they were out but at the end of the night they found one misplaced and were nice enough to come find me at the Yaby booth so I could buy it!  So nice of them!  The new one is more rigid then the old one which is great b/c I was having trouble getting the old one to stay standing all the time.  The best part is it's bigger...def. a BIG plus for me!

The other stuff I bought at IMATS this year was Airbrush stuff.  I've been doing airbrush a bit in the last year but I really want to focus in on it a bit more and I def. needed a wider range of foundations and brands b/c previously I only had OCC.  So I bought a couple of Graftobian airbrush foundations (unfortunately they were out of a lot of them so I just got the two colours I use the most in my cream palettes - Vixen & Ingenue).  I also got a starter set of S/B foundation, Adjusters, Primer and Airbrush Cleaner from Temptu b/c again Vicki Millar always raves about it!

One of the things I was most excited about for the show this year was the fact that Roshar was guest speaking for Yaby! Roshar is a huge inspiration to me and you know what so NICE in person!  Seriously, really friendly...sometimes you're let down when  you meet someone you admire in person.  He did an amazing look for the Yaby seminar...I only wish I could have actually seen it!  That's the only downside to working the show is you never get to see any of the amazing seminars that are held!

Liz, Roshar & Demo Model (Don't you just LOVE the new Yaby pic in the back!)

Ashley, Roshar & Myself

Ashley and I tried on the wig from the demo...not our best looks lol!


Yaby Booth - Busy Busy!

Liz had new display tester units designed - So Much Nicer, Cleaner & Easier for EVERYONE!

Ladies Hard At Work Filling Orders!

Overall, the show was a great success IMO and I def. think it was busier this year on Sunday then last year!  I'm also so excited for Liz and to see how the brand is growing in recognition EVERY year!  Hopefully the show will just keep getting bigger and better!

Thursday, August 11, 2011

Metamorfik

Lucky You, Lucky Me - Bringing you Two New Editorials in Two Days!  Unfortunately, after this one I'm going to be real there won't be anymore "new" work for a bit b/c I'm just busy doing weddings and things like that but don't worry obviously I'll still be writing fun and interesting entries.  Plus I think I am going to do a little video about the layout of my portfolio so you guys can see it all printed and maybe understand a bit more about portfolio flow and stories and all that stuff!

So here is the FINAL story from my epic shoot day w/ photographer Adamo de Pax that I've written so much about these past couple of mths.  Originally, we were trying to get this published but no one was biting :(  I still think it's gorgeous!  To be honest I don't always get magazine editors and the stories they pick up b/c sometimes I see some really boring or crappy stuff published.

Anyway, Adamo and I agreed it's better to just release the images and put them up on our sites then have them published in a subpar magazine.  Truth is (and I'm not trying to brag here) I've had a lot of stories published and the majority of stories in my book are published so I don't really care if I have some pics that aren't published in a magazine b/c to me it's better to have a book full of strong stories then to really concern myself w/ the fact of whether or not a couple of stories weren't picked up by magazines.  Plus having a story published in a crappy magazine doesn't really mean anything or get me any farther ahead this point so who cares.

I love this story b/c it is a progression of one idea and Andrea (the model) did an amazing job of capturing the mood which is sort of like the makeup is possessing or spreading across her like a disease and turning her evil.  Of course Adamo did an amazing job as per usual too!  If anyone is curious I mostly used OCC pigments and the Gold is from my MUFE Flash Palette.


I really love that you can see the texture of the makeup in these pics and I esp. love the bit of red that landed on Andrea's eyelashes lol!

Friday, May 6, 2011

Prom Time - The Beauty of Youth!


Ahh Prom Season is upon us and I got to meet and work w/ a great young lady today - Alexia and her equally awesome mom Siobhan, who is actually close to my age...I'm not going to lie...it's sort of weird when the mom's of my prom clients are in my age group (well a few yrs older).  I'm use to my brides and I being the same age but mom's it's different...but she's like a really cool, hot, young mom - you know the kind you wanted when YOU were young!  Siobhan and I also have the same b-day which I always think is really neat b/c 1. I never meet anyone w/ my bday 2. I'm into that sort of thing...probably why we hit it off so well!  Can't wait to give her a makeup lesson or do her Hair & Makeup for a special event!

Anyway, back to Alexia.  Gorgeous girl w/ great eyebrows and amazing blonde hair!  Seriously, so long but healthy and curls like a dream and so thick too! She was wearing this really cute spaghetti strapped cherry print mini dress from Dolce & Gabbana (actually her mom's).  It had a retro feel so I wanted to go w/ that for the makeup too so I did a really bright red lip to match the cherries in the dress and a bit of bronze/brown on the eyes w/ some black liner just slightly winged (a full wing liner was just a bit too much for Alexia).  I also really wanted to give her a gorgeous glow on the cheeks and of course I used my favourite Yaby Highlighter for that...seriously it just ALWAYS looks amazing on everyone. 

Like many teenagers, Alexia has a little bit of acne but you'd never know it once you put a bit of foundation and concealer to cover it up.  I actually started w/ the MUFE green primer which helped to minimize any redness on the face.  I used Yaby concealer, Graftobian HD cream foundation and lightly finished it off w/ Yaby Powder Foundation for just a bit of extra coverage.  It's important to remember you don't need to cake on the products to get good coverage.  If you use the right products w/ the right technique a little bit goes a long way!

For the hair I just went through and curled 1 inch sections using my favourite curling iron - my Herstyler 3P wand.  Her hair was very long and very thick but it curled so well.  Some ppl just have hair that curls beautifully and she is one of them...lucky girl!.  Originally, we had talked about putting it up into a messy bun ala Taylor Swift but in the end we just left it down and I pinned it to the side which I think went really well w/ the style of the dress.


I've included a few quick snap shots I took of Alexia before I ran out the door.  Excuse the quality it's not the best but she had tons of ppl taking her picture and I didn't want to wear the girl out before the night even started lol!  Plus I think she was starting to get annoyed w/ everyone taking her picture lol!  The pics really don't do justice to the shine of her hair or the highlight on her cheeks but you get the idea.

Wednesday, November 10, 2010

REHAB, the art of re-doing

One of the big deciding factors on my trip to Paris was the fact that my brother Steve had his art show opening the wk I just happened to be thinking about going there.  When I found that out I figured it was just meant to be and too perfect to pass up.

It's all pretty awesome and a big deal for him actually.  He actually got invited to be the resident artist at the gallery for 2 mths and gets funding to live and work there.  Pretty big deal for such a young artist...I mean how many 23 yr olds can open a conversation w/ "Well at my show in Paris..." lol.  I mean it even sounds cool for me to say "I'm going to my brother's art show opening in Paris" lol. 

I'm not a huge art person to be honest and sometimes the stuff goes over my head but this show was a collaboration by a lot of artists and I actually really liked the work and found the curator did an amazing job of creating a very cohesive exhibition. 

I'm not very good at explaining the show so I'll just include the little blurb from the press release:

REHAB, the art of re-doing


Espace Fondation EDF

October 27 2010 - February 20 2011

Over recent years, contemporary artists, whether they be openly eco-conscious or merely aware of the changes in the world, have found right ways to reveal an unsuspected artistic potential of ordinary materials. REHAB, the art of re-doing, the show curated by Bénédicte Ramade at the Espace Fondation EDF, invites us to follow the artists in a new creative experience, as their works, with their surprising aesthetic qualities, use familiar and everyday objects for something they surely were not meant for.

Neither ready-made, remake or pastiche nor eco-freaks, the works shown in REHAB let us rediscover materials we thought there wasn't much to them, from the Formica piece of furniture to the cardboard box. Sculptures, videos, photographs or installations are the favourite mediums used by the eighteen French and foreign artists invited.

The richness of their work is a good example of the ability of the artists to exploit double-sided things like waste: both contemporary material endowed with interesting physical properties and a perfect subject to talk about the most urgent societal issues as environment is. Neither peremptory nor accusatory, the artists express the possibility to take part to this social debate through their works, without passing judgment.

This exhibition extend the commitment of Fondation EDF Diversiterre by the side of architects, designers, landscape architects and artists who constantly offer a new perspective on the great contemporary issues. It also shows the involvement of the foundation in social cohesion and planet preservation.

Here's some of the other exhibitors:

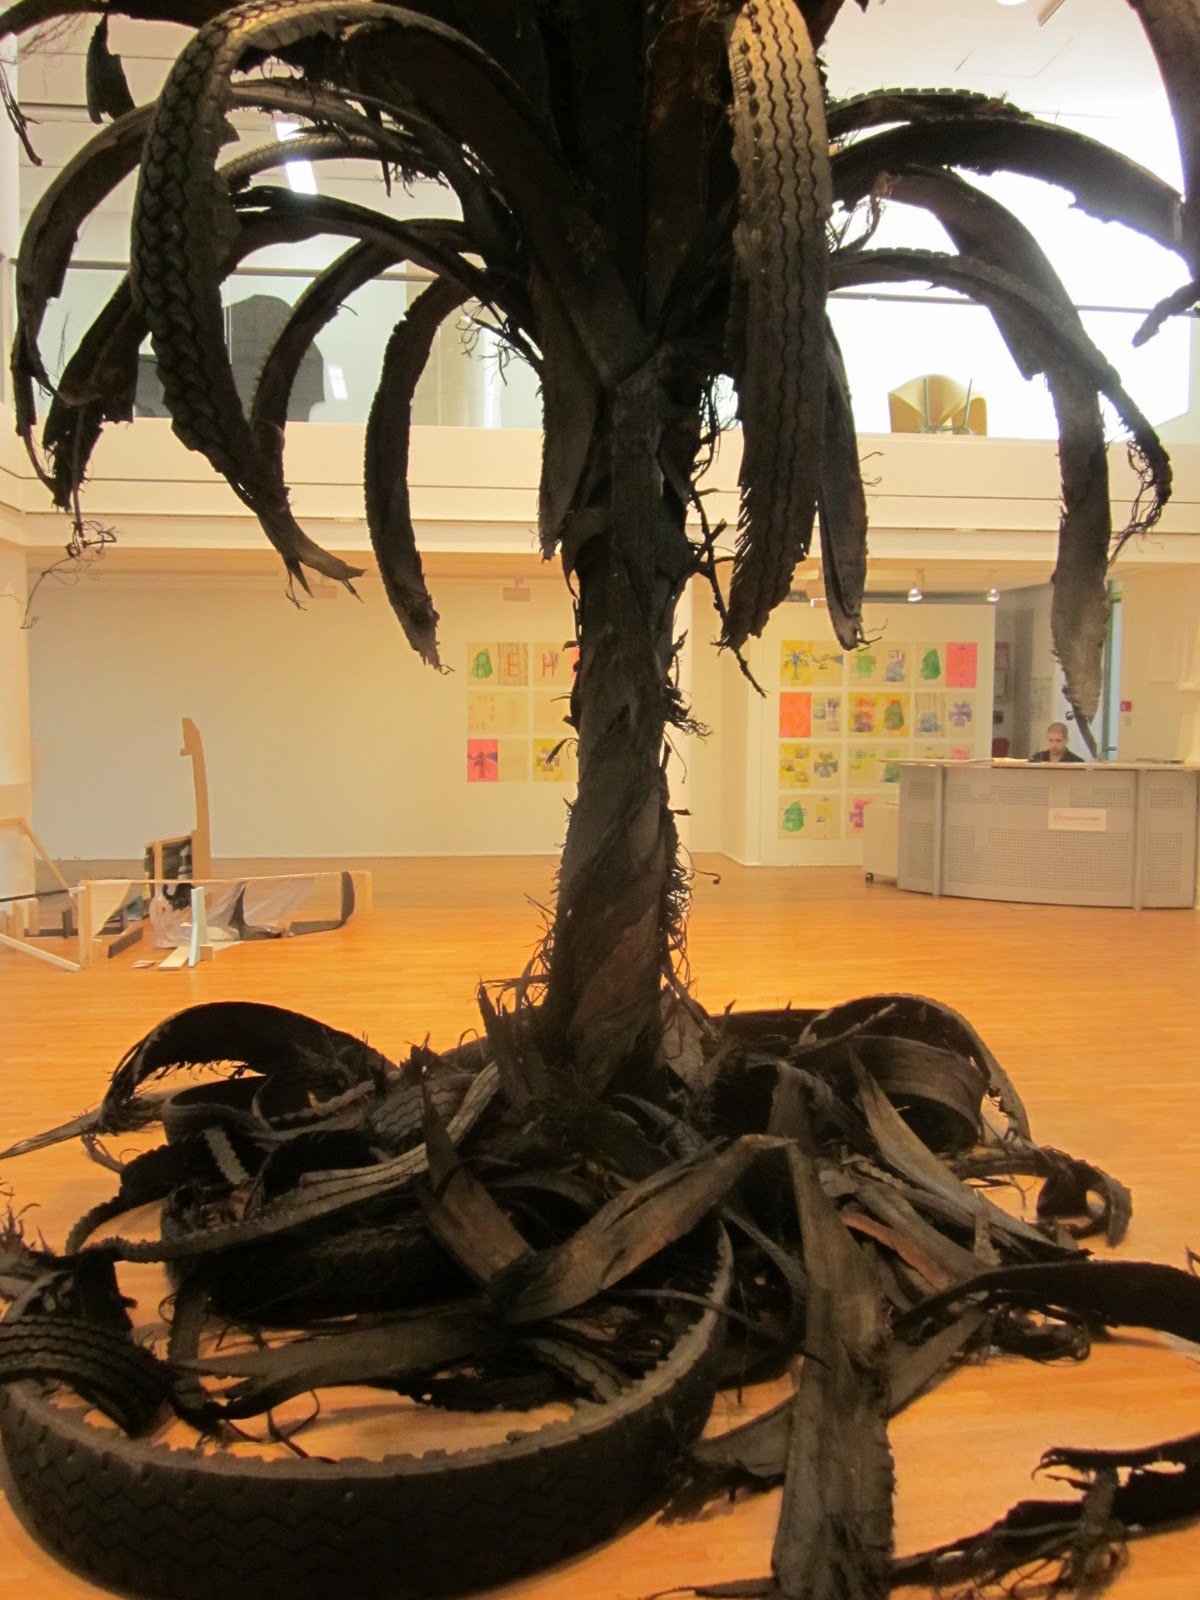
This was in the front room right next to Steve's main piece...definitely a show stopper!
This is actually made out of cardboard
Steve's work was really well received too.  Many ppl came up to him to tell him how impressed they were w/ his work and how cool and different it was.  He actually had two pieces showing.  Lock Ness (which I had actually seen before) and Double Forgery (a new piece).  The interesting thing about his work is it's completely made from reclaimed materials found in the exhibition space so while it may be similar w/ a similar outcome during every exhibition it's actually different b/c every single time he has to deal w/ new challenges that come from the new materials he's using.

Here's his explanation of the two works b/c I suck at describing them in an educated way lol:

Lock Ness

Loch Ness is an evolving project developed over a series of exhibitions since 2008. In each exhibition, I reconstruct a photograph of a Loch Ness Investigation Bureau observation deck taken in 1965 using a live feed-video camera and materials collected from inside and around the gallery space. Assembled within the physical and material constraints of each exhibition space, a live-feed video system translates a unique assemblage of scrap construction materials (wood, cardboard, paper, foamcore board, masking tape, paint, etc…) into the image of Loch Ness on an external monitor.
Here's a the piece from behind the camera...I know it looks like a pile of junk lol
Then from that this is what the camera sees!

Double Forgery

Double Forgery is a small scale installation in which a photograph of Robert Smithson’s Nonsite (Essen Soil and Mirrors) (1969) is recreated using a live-feed video camera and materials (wood, cardboard, paper, dust bunnies, dirt) found at Espace Electra, Paris in October 2010. A “double forgery” historically involves the forgery of an already forged painting, perhaps most famously undertaken in the 1960s by Jacques van Meegeren, son of the notorious Vermeer forger Han van Meegeren. In Double Forgery, I forge not a nonsite, but a photograph of a nonsite that was already remade for a Robert Smithson retrospective at the Museum of Contemporary Art in Los Angeles in 2004.

So this is the piece as it looks just to view it
And this is the piece as it's seen by the camera and put on the TV screen...still don't get how it works!?!
So the VIP opening actually ended up being very exciting and high end!  Literally, unlimited champagne and INSANE appetizers and desserts which you know I took full advantage of ;)  This appetizers and desserts were like little works of art themselves...I can't even describe how some of them looked...and I made a point to try each and every one of them at least once...some even twice lol!  No wonder my face looked all swollen and puffy the whole time I was in Paris lol!

So now I'll actually bring the blog back to some makeup talk lol!  I did Steve's wife Ania's makeup for the opening.  Earlier that day we went to the Make Up For Ever Boutique and I had helped her choose some new colours just for her.  So I made sure to keep the look super soft and pretty b/c she's not a big makeup girl...and my brother is DEFINITELY not a big makeup guy...at least on his wife (which I found out even more at the opening).  To finish it all off and make it special I added some flirty, flared false lashes.  I used some of my Model 21 lashes and I have to admit I love these things.  All my brides go on and on about how natural they look and they looked so natural and yet dramatic on Ania.

So we got to the gallery and Steve was already there and he took one look at Ania and I literally thought he was going to cry...and not in a good way :S You'd swear he just saw her kissing another guy or something the way he looked! Turned out the false lashes were just too much for him! And I know natural makeup...they did NOT look like too much at all. Ania and I went to the washroom immediately and took them off. Now normally I would have told my brother to suck it b/c she looked gorgeous and she loved the false lashes so if she wants to wear them she should! But I agreed b/c it was "his special day" and I could tell he was really really nervous so I understood w/ all the stress he justed wanted to see his wife in her usual way that he's used to. I guess it's nice that he loves her natural beauty and doesn't think she needs anything to make her look better...although I still did ride him that night about making me compromise "my art" lol.


I took 1 pic in the washroom before I took off the eyelashes...too dramatic I DEFINITELY think not!
 Steve talking about his art
 They are so cute together!


Tuesday, November 2, 2010

Make Up For Ever Boutique in Paris

Well I'm back from Europe and have A LOT of posting to catch up on!  Sorry I didn't update more while in Europe I just got so busy and the internet was a little slow so it made uploading pics really annoying. 

So in between doing all my fun touristy things and attending my brother's art show in Paris I made a little time to visit the Make Up For Ever Boutique in Paris!  Very exciting indeed!  I went w/ my sister-in-law Ania who was very patient (we were in the store for a good 2 hrs lol) and even took notes for me as I decided what to buy lol.   In return for her patience I helped her pick out a few items for herself and use my pro discount (very happy to find out it worked in Paris). 

So after hours of deliberation I finally decided upon a large empty palette (I don't think we have these in Canada) and 8 eyeshadows and 5 lipstick circles that fit in the palette.  I don't think we have the little lipstick circles in Canada either...maybe I'm wrong either way they are awesome. 

Here's some pics of me in front of the store - Before & After said purchases lol...plus a couple of pics inside the store...could only snap a few before they asked me to stop lol.
 Black Light Pigments...very tempting wish I had a shoot to justify buying those!


So yesterday I decided to organize and clean some of my palettes and I decided since my new MUFE palette is so large I should condense some of my other palettes into this one.  I took all of my Yaby brow shadows, cake liners and eyeshadows (except my browns & beiges still in another Yaby Palette) and added them to my 8 new MUFE shadows.

 While in the MUFE boutique I also came across this amazing French makeup artist magazine called MUP (Makeup Professional Magazine).  I can't really read it b/c my french is pretty rusty but the pictures are gorgeous!  Seriously inspiring!  I was only going to buy 1 of the issues out of the 3 in the store b/c each one was 14 euros but I knew if I didn't get the other 2 I'd just be back the next day to buy them...so I indulged (it's a tax write off afterall ;) ).

Wednesday, July 7, 2010

More MUFE Product Reviews!

Hey sorry for the absence been super busy w/ weddings, proms and other jobs...which is always good! Hopefully, some of the beautiful brides I worked w/ will send me some pictures from their special day and I'll be able to share them w/ you. Plus I have a couple of editorials coming out this week...FINALLY so there will be lots of updating with them :)

Anyway, back to my review. This is a product I've actually had in my kit for awhile but I've found that I've been using it a lot lately (ppl getting a bit too much sun perhaps ;) ) so I thought I'd talk about it.

I always prime the skin before I put down my foundation...unless of course I'm using Face Atelier which is a silicone based foundation and therefore has a built in primer. When I was in school I was taught it's like painting a wall - you always prime it first. For those that don't know primers are a great way to create a smoother surface for the makeup to lay on. It helps create a barrier between your skin and the foundation and it can help prevent your foundation from migrating into those pesky fine lines. It also helps blur any skin imperfections and helps your foundation last longer which is always a good thing for weddings...and esp. in the heat we've been experiencing lately.

Primers like the Make Up For Ever HD Primers can also be great for adjusting and minimizing certain discolorations in the skin. A common discoloration problem is redness in the skin whether it be from rosacea, acne or a sun burn. The green MUFE primer is great for reducing these issues before you even get to the concealer and foundation step. Now I'm not saying this primer is a miracle worker and it will take out all the red from the skin but it will reduce the problem and it can be a great product for someone who doesn't actually like to wear makeup but wants something that's going to finish the skin w/out the use of foundations...even guys could use it...and a lot of guys do tend to suffer from excess redness in the face... of course sometimes that has to do w/ a little too much drinking and not skin discoloration lol!

So recently I've had a lot of clients w/ all sorts of skin concerns (I guess this is what happens when you work w/ "real" ppl and not models all the time lol) - a mother of the bride w/ rosacea, a bridesmaid w/ acne, a girl going to her prom that got burnt in the tanning bed the day before (NEVER tan the day before a big event...even when you have a miracle worker makeup artist coming to your house lol!). Anyway, what they all have in common is that I used the Green MUFE HD Primer on them to start...and they all looked fabulous when I was done w/ them ;)

Monday, June 21, 2010

Product Review: MUFE Aqua Liners

For the Red Bull Air Race event my makeup look consisted of a very heavily winged liner...like Amy Winehouse style sort of...but hopefully less dirty and slept in lol and it incorporated two colours not just the solid black. Plus a sculpted cheek and nude lip w/ gloss...but the main focus was the eyes w/ the huge winged liner covering the whole lid and ending just near the end of the brows...plus some wicked cool lashes.

I had 5 girls to make up every morning...this is makeup & hair...and they had to be ready early so that usually meant my day was starting at 6 am (ugh). So 5 girls, elaborate makeup & hair and I can't take all day to do it but it still has to look good b/c well I don't like to put sloppy shit work out there lol.

My biggest concern about this whole thing was this huge winged liner b/c 1. I'm a perfectionist and I like to get things balanced on both sides 2. Winged liners are actually something I struggle w/ a bit...always get that one side good but can't match it to the other. I knew w/ there being 5 girls that I would need something that would allow me to breeze through these girls really fast and hold up to the heat and sweat of working outside all day in spandex body suits, full sleeve jackets and boots.

So w/ this being said it occurred to me that I should get some Make Up For Ever Aqua Liners in the colours I wanted to do the eyes in. I figured it would be much easier to draw a huge winged liner w/ a pencil and colour it in then try to be all perfect w/ eyeshadow and a brush. Plus they are waterproof how can I go wrong! This seriously had to have been one of the smartest investments I've ever made for a job! These babies are insane and totally did the job I needed. I got Silver, Black and Teal and the colours are gorgeous. After I drew in my design and coloured it in w/ the pencil which was sooo easy and saved me sooo much time I then pressed a little bit of shadow over it in the coordinating colour just to give it extra punch. Although I'll say the colours alone were totally powerful. This stuff didn't budge at all...even in the heat and w/ the girls sweating. I didn't have to touch the eyes up once throughout the day...no creasing...nothing!

To give a perfect example about their staying power. One of the models was sick the night of the first day. She went back to her room and puked and passed out in her bed still wearing the makeup (sorry for the grossness lol). Anyway, her roommate said the next day when she saw her the makeup was still totally in place and perfect like I had just applied it! It's sweat, puke and sleep resistant...holy shit that's amazing!

The crazy thing is I've never been much of an eyeliner makeup artist...just one more thing to carry IMO. I've always just used an angled brush and either eyeshadow w/ a transforming gel or some cake liner but I have to say these little babies just might make me a convert for other occasions too!

Seriously, check them out! Side note - the MUFE lashes (Valerie #112) I used were amazing too. Totally big and glam and yet the girls said they were pretty comfortable and light and had no time wearing them the full day...which was like 12 hrs! Sometimes girls have trouble even keeping their eyes open w/ a huge full false lash but no issues here. Plus they were able to easily reuse them the entire 3 days and they still looked like new!

Tuesday, December 29, 2009

Kit Organizing!

So for x-mas I got a new makeup kit from my bf Alistair! Thank God b/c my other one was literally falling apart. It was actually quite embarrassing and had been ripping at the seams pretty much from the first wk I got it. It was like a Frankenkit w/ all the ghetto stitching I had sewn on it. My old kit if anyone is interested was the MUFE Professional Bag which was great b/c it was lightweight, clothe over the shoulder bag w/ lots of pockets which I like b/c I do take public transportation so I pack light but the stitching just isn't reinforced enough...apparently it's a big prob w/ the bag I found out from MUFE (they ended up giving me the bag for free b/c they didn't have any in stock when it ripped at first for me and I was leaving for Shanghai).

The new one is a bit heavier but it does seem a lot sturdier and well made but it is still an over the shoulder style bag. I have a ton of room in it and I think for a lot of simple jobs I might be able to pack light and carry a small hair kit in it too! It comes w/ trays in the bottom section but I personally took them out and I'm just putting pouches w/ stuff in there (one good thing I kept from the MUFE bag was all the removable pouches). It's from Yazmo.com if anyone is interested and they sell a ton of great makeup kits whatever your style is.

So I took a bunch of pics of kit so anyone that is interested can see how I pack for a shoot and the kinds of products I like to take w/ me. The stuff I'm showing in the pics is a lot of makeup for me and truthfully most of the time I wouldn't pack all this stuff...as mentioned before I usually like to keep it as light as possible and pack for that specific job if at all possible.

My Kit
The empty bottom where I took out the trays
One of the side pockets. If I do bring hair stuff in this kit this will be a good pocket...otherwise might use it for cellphone, water, apple etc.
Packed Kit
Inside the top of my Kit
Pouches in the Bottom Container (where trays were originally). Can you tell I like Yaby already lol. Seriously condensed my kit SOOO MUCH! I Normally wouldn't bring all the palettes in the pouch to EVERY shoot.
Brush Pouch
Big Pouch #1 - Yaby Palettes and MUFE Flash Palette - 3 Yaby Powder Foundation Palettes (Light, Med, Dark) and Highlighting Palette (Love). 1 Homemade Lip Palette (just took all my lipsticks, cut and smooshed them into empties and put them in a Yaby Freestyle Palette (many different brands). 1 Freestyle palette w/ Yaby Blush and 2 Nixie Blushes w/ a few old MAC Shadows. 3 Eyeshadow Palettes - The one on the far Right is my Neutrals Working Palette w/ cake liners and eyebrow colours too. The others are more fun. They are all a mix of Yaby shadows (pearl paint and reg) and I pressed a bunch of OCC, Face Atelier and Fyrinnae pigments into shadows...plus there's a few old MAC shadows.
Big Pouch #2 - Foundation Pouch - I have another pouch inside that one which holds my Face Atelier Foundations and my Keromask Consealers. 2 RCMA Palettes (which to be honest I don't use that much). Graftobian and Cinema Secrets Palettes and Yaby Liquid Foundations.
Side Pouch Randoms - Mixing Palette, MAC Brown Shadow Palette, Blush Palette w/ La Femme and Nixie Blushes. Benefit Leg Moisturizer (creates a nice sheen on the legs and smells nice :) ). Not shown but also carry hand towel and wipes here too.
Pouches inside the top section of the kit...and there's still more room!
Small Black Pouch - Random Tools - Eyelash Curler, Tweezers, Sharpener, Nail File, Disposables (Lip/Mascara/Spatulas), Scissors, Eyelash/Eyebrow Comb, Tide Stick, Eyebrow Razors Etc.
Bigger Black Pouch - Eye Stuff - Mascara - Black, Clear, Brown, Face Atelier Transforming Gel, Under Eye Brighteners - Benefit and Smashbox, Urban Decay Primer, DUO Eyelash Glue, MAC Matte and Glossy Gel, Fyrinnae Eye Primer and Pixie Epoxy (helps glitter stick)
Lip Pouch - Face Atelier Lip Gloss, OCC Lip Tar in Clear and OCC Lip Balm in Tarred and Feathered, MUFE Glossy Full, Random Smashbox Lip Palette, Face Atelier Lip Putty and Lip RX, 2 Graftobian Lip Palettes, MAC Lip Exfoliater and Benefit She-Laq

Med Black Mesh Pouch #1 - OCC
Lip Tars - Black/White and Primary Colours, Alcone Sponges, Smashbox and Benefit Luminizers, Eyelashes, Camera Ready Cosmetics Cream Blush Wheel and Empty Bowl
Med Black Mesh Pouch #2 - Nail Polisher Remover Pads, Makeup Remover Wipes, Eye Makeup Remover, Q-Tips, Various Primers - MUFE, Fyrinnae (Cream and Powder) and Benefit, Cotton Pads, Makeup Puffs, Yaby Translucent Powder, Eyedrops, Mouth Wash, Mini Sewing Kit, Embryolisse Moisturizer, Vaseline, MAC Strobe Cream Etc.
Liquids Pouch - 99% Alcohol, Water, Toner, Glycerin, Final Seal, Brush Cleaner, Hand Sanitizer, MUFE Elixir, MAC Fix + Etc.
Okay so that's EVERYTHING in my kit...and I'm not lying there is still a lot of room in there! Plus like I said before I normally wouldn't bring ALL of this stuff to every shoot. I highly suggest everyone condense their kits...it just makes everything quicker to find and therefore you are quicker on set. I really don't even know what I would do w/ a rolling kit anymore...I don't know if I could fill it lol!